About This Article
This article assumes you are familiar with creating and editing event types. If you would like to brush up on event types, click here.
Contents
- What's an Event Status?
- Enabling Event Statuses
- Locating the Status Bar Settings
- Customizing the Event Status Options
- Viewing & Updating an Event’s Status
What's an Event Status?
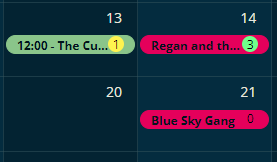
When we're talking about event status, we're basically talking about these numbers on the right side of an event.

These numbers indicate the current status of the event. They always start at zero and count upwards towards a final number, usually indicating event completion. The total number of statuses and what each status number means can be customized by your group admins.
Enabling Event Statuses
You can activate Event Statuses on any event type. Either during event type creation or on an existing event type. For existing types, open the event type then click Edit to get started.

Once the edit box pops up, click Use Status Bar to turn the feature on for this event type. This step is required for each event type that you'd like to give a status bar to.

Locating the Status Bar Settings
If Event Status is enabled on the event type as shown in the image above, scroll down the event type until you see the item labeled Status Bar.

This image has been altered to make the Status Bar settings closer to the top. You'll probably have to scroll down to find it on your screen.
Customizing the Event Status Options
The Name column describes the step or phase the event is in, while Number is a shorthand for the Name. Percent decides the sequence in the progression from start to finish.

In this example, Contract Signed would appear as ![]() on the event in your calendar.
on the event in your calendar.
To add more steps, type the status name in the box below and hit enter.

Note
There can be up to 10 steps in the status bar.

The newly added phase will be assigned the first available percentage value. In the example image below, 30 is the first percentage available, as 10 and 20 are already taken. The next newly created step would appear on the yellow line (which was added after the screenshot was taken.)

Viewing & Updating an Event’s Status
Events with an event type with Event Statuses enabled will have a number on their right side.

To update an event's status, click the event in your group's dashboard. Along the top, you will see the status phases. Clicking a phase will update the status number on the event.

Workflow Idea
It's not required, but keeping the same number of steps for each event may make it easier to see how far along your events are. If event type one has 3 steps and event type two has 10, then an event marked with a 2 can be either in an early or advanced stage depending on the event type.
Let us know if this article helped you understand how to set up and use the Event Status feature.
All the best from us at Team Crescat.